A Step-by-Step Guide in Repairing Gutter Seam Leaks
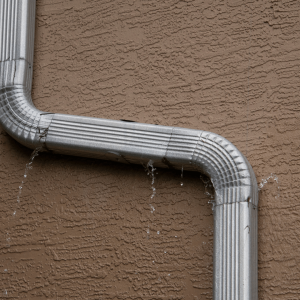
Gutter seam leaks are a common problem that can lead to significant damage if not addressed promptly. From water pooling around your home’s foundation to causing structural issues, leaky gutters can affect both your exterior and interior spaces. The key to preventing these costly repairs is regular maintenance, especially focusing on the seams and joints where leaks tend to develop.
At HomeSmiles, we specialize in Preventative Home Maintenance, offering comprehensive services like Gutter Cleaning, Pressure Washing, and Window Washing. Our mission is to handle the maintenance tasks that homeowners often overlook, saving you from unexpected repairs and ensuring that your home remains in excellent condition.
In this article, we’ll walk you through how to fix gutter seam leaks, the best sealants to use, and answer common questions about repairing gutters. Whether you’re tackling this as a DIY project or looking for professional assistance, we’ve got you covered.
Common Causes of Gutter Seam Leaks
Gutter seams are the points where two sections of the gutter system meet. While they’re designed to channel water away from your home, they are also the most vulnerable to leaks. Over time, exposure to the elements, debris buildup, and poor installation can cause these seams to weaken and start leaking.
Main Causes of Gutter Seam Leaks:
- Debris Buildup: Leaves, twigs, and dirt can accumulate in your gutters, creating blockages that prevent water from flowing freely. As water pools at the seams, the pressure can cause leaks. Regular Gutter Cleaning helps prevent these blockages and reduces the risk of leaks.
- Weather Damage: Severe weather conditions, such as heavy rain, snow, and strong winds, can cause gutters to expand and contract. This constant movement can weaken the seams and joints, leading to cracks and leaks. Preventative Home Maintenance, like checking your gutters after storms, can catch these problems early.
- Aging Gutters: Over time, gutter systems naturally degrade due to rust, corrosion, or wear from constant exposure to moisture and temperature changes. Seam leaks are often the first signs of an aging gutter system that may need repair or replacement.
- Improper Installation: If gutters were not installed correctly, the seams might not align properly, causing gaps where water can leak through. Regular Exterior Home Maintenance inspections can help identify poor installation and prevent issues before they become serious.
Addressing these common causes through consistent Preventative Home Maintenance and Exterior Home Maintenance can help extend the life of your gutters and keep your home protected.
How to Fix Gutter Leaking at the Seam
Repairing a leaking gutter seam is a manageable task that homeowners can undertake with the right tools and materials. Here’s a step-by-step guide to help you fix the leak effectively and ensure your gutters function properly.
Step-by-Step Guide:
- Clean the Area:
- Before starting the repair, clean the gutter thoroughly. Remove any leaves, twigs, and debris that may obstruct your work. This ensures a clean surface for the sealant to adhere to.
- Use a putty knife or a small brush to scrub the seam area, and ensure it’s free of dirt and grime.
- Dry the Seam:
- Once the area is clean, dry the seam completely. If the seam is still wet, the sealant may not bond effectively. You can use a towel or let it air dry for a few hours, depending on the weather.
- Apply Sealant:
- Choose a suitable sealant for gutters, such as silicone-based or urethane sealant, which are designed to withstand moisture and provide a long-lasting bond.
- Using a caulk gun, apply the sealant generously along the seam. Make sure to fill any gaps or cracks, ensuring a complete seal.
- Smooth the sealant with your finger or a putty knife for an even finish and to ensure it penetrates into the seam.
- Test the Repair:
- After the sealant has been applied, wait for the manufacturer’s recommended curing time before testing the repair. This usually takes 24 hours but can vary based on the product used.
- Once cured, test the seam by running water through the gutter or waiting for the next rain. Check for any signs of leaking and ensure that the repair holds.
By following these steps, you can effectively fix gutter leaks at the seams and prevent future issues. Regular maintenance, such as Gutter Cleaning and inspections, will help identify potential leaks early, keeping your home protected from water damage.
How to Fix a Leaking Gutter Joint
Leaking gutter joints can be a significant issue, often leading to water damage if left untreated. Thankfully, repairing a leaking gutter joint is a straightforward process. Follow these steps to ensure your gutters remain leak-free and functional.
Step-by-Step Guide:
- Separate Gutter Sections:
- Carefully detach the sections of the gutter around the joint that is leaking. Use a screwdriver or pliers to remove any screws or clips holding the sections together.
- Take care not to damage the gutter system during this process, as you may need to reattach the same sections.
- Clean and Inspect the Joint:
- With the sections separated, clean the joint thoroughly. Remove any debris, old sealant, or dirt that may be present. Use a putty knife to scrape away any stubborn residue.
- Inspect the joint for any visible damage, such as cracks or corrosion. If the joint is severely damaged, it may need to be replaced entirely.
- Reapply Sealant:
- After cleaning, apply a new layer of sealant specifically designed for gutters. Silicone-based or butyl rubber sealants work well for this application.
- Generously apply the sealant to both the inside and outside of the joint to ensure a strong, watertight seal. Ensure that it fills all gaps and covers any cracks effectively.
- Reassemble and Secure the Gutter:
- Carefully reattach the gutter sections, aligning them properly at the joint. Make sure they fit snugly together.
- Use screws or clips to secure the sections in place. Tighten them without over-torquing, which could damage the gutters.
- Test the Repair:
- Similar to repairing a seam, allow the sealant to cure according to the manufacturer’s instructions—typically 24 hours.
- After curing, test the joint by running water through the gutter. Check for any leaks and ensure the repair holds.
By addressing leaking gutter joints promptly, you can prevent further water damage and maintain the integrity of your home. Regular Preventative Home Maintenance practices, such as inspecting and cleaning your gutters, will help avoid these issues in the future and ensure your gutter system works efficiently.
What is the Best Sealant for Gutter Seams?
Choosing the right sealant for gutter seams is crucial to ensure long-lasting repairs and prevent leaks. With various options available, it’s essential to understand which sealants work best for your specific needs. Here, we’ll explore the most effective sealant types for gutter seams and their benefits.
Types of Sealants for Gutter Seams:
- Silicone-Based Sealants:
- Advantages: Silicone sealants are highly flexible and waterproof, making them ideal for outdoor applications. They adhere well to various materials, including metal and plastic, and can withstand extreme temperatures and weather conditions.
- Application: When applying silicone sealant, ensure the surface is clean and dry. Allow it to cure fully before exposing it to water.
- Urethane Sealants:
- Advantages: Urethane sealants offer excellent adhesion and durability, providing a strong bond at seams and joints. They are resistant to UV rays and can handle temperature fluctuations, making them suitable for exterior use.
- Application: Urethane sealants require a bit more prep work, as the surfaces should be thoroughly cleaned. Follow the manufacturer’s instructions for application and curing times.
- Butyl Rubber Sealants:
- Advantages: Known for their superior flexibility and water resistance, butyl rubber sealants are excellent for sealing gutters. They are less prone to cracking over time compared to other sealants, making them ideal for areas that experience frequent movement.
- Application: Apply butyl rubber sealant in a thick bead, ensuring it fills any gaps completely. It may take longer to cure than silicone or urethane, so be sure to allow ample drying time.
Tips for Choosing the Right Sealant:
- Material Compatibility: Ensure the sealant you choose is compatible with your gutter material (e.g., aluminum, vinyl, or galvanized steel).
- Weather Resistance: Select a sealant that can withstand the local climate conditions, especially if you experience extreme temperatures or heavy rainfall.
- Application Ease: Consider whether you prefer a sealant that is easy to apply and clean up. Many products come in caulk tubes for straightforward application with a caulk gun.
Regular Maintenance:
In addition to using the right sealant, regular Gutter Cleaning and inspections are vital to prevent future leaks. By keeping your gutters clear of debris, you reduce the strain on seams and joints, helping maintain their integrity.
Can You Use Flex Seal on Gutter Seams?
Flex Seal is a popular product known for its ability to create a watertight seal and is often used in various home repair applications. However, when it comes to using Flex Seal on gutter seams, there are some important considerations to keep in mind.
Pros of Using Flex Seal on Gutter Seams:
- Waterproofing: Flex Seal is designed to create a strong, waterproof barrier, making it effective in sealing leaks and preventing further water damage.
- Ease of Application: Available in spray, liquid, and tape forms, Flex Seal is easy to apply, requiring minimal tools. The spray can be particularly handy for reaching difficult areas in your gutter system.
- Versatility: Flex Seal can bond to multiple materials, including metal, vinyl, and plastic, making it a flexible option for various gutter systems.
Cons of Using Flex Seal on Gutter Seams:
- Durability: While Flex Seal provides immediate waterproofing, its longevity can be questionable, especially under extreme weather conditions. Traditional sealants, such as silicone or urethane, may offer a longer-lasting solution.
- Temperature Sensitivity: Flex Seal can become brittle in extremely cold temperatures and may not perform as well during freezing conditions compared to other sealants designed specifically for outdoor use.
- Not a Structural Repair: While it can seal leaks, Flex Seal should not be used as a permanent fix for structural issues, such as cracks in the gutter system itself. For more significant damage, it’s essential to consider proper repairs or replacements.
Best Practices When Using Flex Seal:
- Clean the Area: Just like with any sealant, ensure the area is clean and dry before application. This helps Flex Seal adhere properly.
- Follow Instructions: Read the manufacturer’s instructions carefully, especially regarding curing times and application techniques.
- Monitor for Longevity: Regularly check the seams treated with Flex Seal to ensure they hold up over time, and be prepared to reapply as necessary.
Using Flex Seal on gutter seams can be a temporary solution for minor leaks, but for a more durable and long-lasting fix, consider traditional sealants specifically designed for gutter applications. Regular inspections and Gutter Cleaning will help maintain the overall health of your gutter system, preventing leaks before they become major issues.
How Long Does Flex Seal Last Once Applied?
When considering Flex Seal for gutter seam repairs, it’s important to understand its longevity and how it compares to traditional sealants. Here’s a closer look at how long Flex Seal typically lasts and factors that can affect its durability.
Typical Lifespan of Flex Seal:
- General Duration: Flex Seal can last anywhere from a few months to a few years, depending on several factors such as environmental conditions, the surface it’s applied to, and the amount of wear and tear it experiences.
- Weather Resistance: While Flex Seal is designed to withstand moisture, exposure to harsh weather conditions—such as extreme heat, cold, or heavy rain—can significantly affect its lifespan. In regions with severe weather, Flex Seal may degrade faster than it would in milder climates.
Factors Affecting Longevity:
Surface Preparation:
- Properly cleaning and preparing the surface before applying Flex Seal is crucial. Contaminants like dirt, oil, or moisture can compromise the seal’s adhesion, leading to early failure.
Application Thickness:
- Applying Flex Seal in thicker layers can provide better coverage and enhance its durability. However, too thick of a layer might also lead to cracking as it cures, especially in cooler temperatures.
Maintenance:
- Regularly inspecting the sealed areas can help catch any issues early. If you notice signs of wear or cracking, reapplying Flex Seal promptly can extend its overall effectiveness.
Comparison to Traditional Sealants:
- Durability: While Flex Seal is an effective temporary solution, traditional sealants like silicone or urethane generally offer superior longevity. These sealants can last five years or more with proper maintenance, making them a better choice for long-term gutter repairs.
- Reapplication: Flex Seal may require more frequent reapplication, especially in high-traffic or weather-exposed areas, whereas traditional sealants typically maintain their integrity longer, reducing the need for ongoing maintenance.
Flex Seal can be a useful short-term fix for gutter seam leaks, but homeowners should be aware of its limited lifespan and the conditions that can affect its performance. For more permanent repairs, consider using traditional sealants specifically designed for gutters. Regular Preventative Home Maintenance, including thorough inspections and Gutter Cleaning, will help you identify potential issues early and keep your gutters in optimal condition.
Should Gutter Seams Be Caulked?
Gutter seams play a critical role in directing water away from your home, and ensuring they are sealed properly is essential for preventing leaks. One common question homeowners ask is whether they should caulk their gutter seams. Here’s what you need to know.
The Importance of Sealing Gutter Seams
- Preventing Water Damage: Properly sealed seams help prevent water from leaking into your home’s foundation, walls, and roof, which can lead to significant water damage and costly repairs.
- Maintaining Structural Integrity: When gutters leak, water can pool around your foundation or seep into your roof, weakening the structure over time. Caulking seams creates a watertight seal that helps maintain the integrity of your home.
When to Caulk Gutter Seams
New Installations: If you’re installing new gutters, it’s a good idea to caulk the seams to ensure a robust and leak-free system from the start.
Repairing Existing Leaks: If you notice leaks at the seams during your regular maintenance checks, caulking them is an effective way to address the issue promptly.
Annual Inspections: As part of your preventative home maintenance routine, inspect your gutter seams annually and reapply caulk as necessary. Regular inspections help identify potential problems before they escalate.
Best Practices for Caulking Gutter Seams
Choose the Right Sealant: Use a high-quality sealant designed specifically for gutters, such as silicone, urethane, or butyl rubber. These materials are waterproof and provide a flexible seal that can withstand the elements.
Clean the Area: Before applying caulk, clean the seam thoroughly to remove any dirt, debris, or old sealant. This ensures proper adhesion and a strong bond.
Apply Evenly: When caulking, apply an even bead of sealant along the seam, filling any gaps or cracks. Smooth it out with a caulk smoothing tool or your finger for a neat finish.
Allow Proper Curing Time: Follow the manufacturer’s instructions for curing times. Most sealants require at least 24 hours to cure fully before exposing them to water.
Caulking gutter seams is an essential step in ensuring your gutters function effectively and protect your home from water damage. By using the right sealant and conducting regular inspections, you can maintain a watertight seal that keeps your gutter system in optimal condition. Incorporating Gutter Cleaning and other Preventative Home Maintenance practices into your routine will help extend the lifespan of your gutters and prevent costly repairs down the line.
Repairing gutter seam leaks is essential for maintaining the integrity of your home and preventing costly water damage. By understanding how to fix these leaks effectively and choosing the right sealants, you can ensure your gutters function properly and protect your home from potential harm.
In summary:
- Proper Repairs: Knowing how to fix gutter leaks at the seams is vital for preventing water intrusion into your home.
- Choosing Sealants: Opt for high-quality sealants like silicone or urethane for long-lasting repairs, while keeping in mind that products like Flex Seal can offer temporary solutions.
- Regular Maintenance: Caulking gutter seams and performing regular inspections and cleaning can extend the lifespan of your gutter system.
By incorporating these practices into your Preventative Home Maintenance routine, you can avoid significant repairs and ensure that your home remains safe and sound.
At HomeSmiles, we specialize in comprehensive home maintenance services, including Gutter Cleaning, Window Washing, and more. If you’re concerned about your gutters or need assistance with interior or exterior home maintenance, don’t hesitate to reach out! Schedule an appointment with us today, and let our expert team handle those “honey-do” items on your list. Together, we can protect your home and give you peace of mind!
- Protecting Your Property: Why the Right Cleaning Method Makes All the Difference
- The #1 Thing That’s Dulling Your Curb Appeal (And How to Fix It)
- How Maintenance Bundles Provide Peace of Mind for Busy Small Business Owners and Facility Managers
- Essential vs. Complete Home Packages: Choosing the Right Preventive Care for Your Property
- How a Simplified Service Model Benefits Both Homeowners and Franchisees Alike


