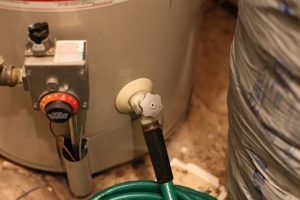
How To Flush Your Hot Water Heater
When it comes to doing household chores, flushing your hot water heater is easy to overlook. But regularly flushing out your hot water heater is an important task. Getting rid of the gunk and mineral deposits that accumulate will help your hot water heater run more efficiently as well as prolong its life, saving you money in the long run.
If you’ve lived in your home for several years and haven’t performed this maintenance yet, it’s time to tackle this chore. Fortunately, we’ve got an easy to follow step-by-step process on how to do this.
Here’s how:
How Often Should You Flush Your Hot Water Heater?
Depending on your model, you want to flush your hot water heater every 1 to 3 years. Really, the job isn’t as hard as it sounds. It just takes time. And as they say, time is money.
How to Flush Your Hot Water Heater
Hot water heaters come in two varieties: gas and electric, but for the purposes of this article, these instructions will be geared towards flushing a gas hot water heater. The biggest difference between gas and electric is that with gas, you’ll be turning off the gas to your appliance; with an electric, you’ll be turning off the electricity.
1. Turn the Knob on Your Hot Water Heater’s Thermostat to “Off”
The thermostat on a gas hot water heater is usually found near the bottom of the tank. You can also set your thermostat to “Pilot.” If you turn your hot water heater off, and you have an older model, you’ll have to re-light your pilot light.
If you have an electric hot water heater, you’ll want to find your home’s breaker box and turn off the switch that gives power to your hot water heater.
2. Turn Off Gas to Hot Water Heater
If you have a gas hot water heater, find the gas pipe leading to your thermostat and pilot light and turn the valve to the off position. If you decide to just turn your thermostat to “pilot” you won’t need to do this step.
3. Turn Off the Cold Water Supply to Hot Water Heater
The cold water valve is usually near the top of your hot water heater. Turn it to off.
4. Turn on the Hot Water in a Sink or Tub
Leave them on during the entire flushing process. This will help prevent a vacuum from forming in the lines while you’re draining the hot water tank.
5. Open the Pressure Relief Valve
This isn’t a necessary step, but it can help water flow more easily while draining and it allows you to test your pressure relief valve, thus killing two birds with one stone. Make sure you have a bucket beneath the drainage pipe on your pressure relief valve before opening as water will be rush out. Be careful. This water will likely be very hot. If water doesn’t come out, you’ve got a faulty pressure relief valve and it will need replacing.
After you’ve opened the pressure relief valve, let the water in your hot water tank cool.
6. Connect Garden Hose to Drainage Spigot
Before you turn on the spigot, make sure the other end of the hose leads outside or at least into a bucket. If your hot water heater is in the basement, you may need to get a portable pump in order to pump water out of the basement and to the ground floor.
7. Turn on Spigot and Drain
Drain your tank until the water runs clear and no longer has sediment. If your tank has a lot of sediment, you may need to drain it completely. As you can see in this picture above, the water here was a bit brown and there was a lot of sediment at the bottom of the bowl.
8. Flush
To flush your hot water tank, simply turn on the cold water spigot leading into your hot water tank. Let it run for a few minutes until the water exiting your hose runs clear.
This may take a bit. While the water might be running clear and isn’t brown, you may still have some sediment. Here’s a picture of the water coming from at the start of flushing:
As you can see, there is still some sediment (can be seen at the bottom) coming out. Continue flushing until you have very little or no sediment in your water. Turn off the cold water spigot leading into your hot water tank.
Finishing Things Up
Once you’re satisfied with the clarity of your water, it’s time to put things back to the way they were.
- Turn off the drainage spigot and disconnect hose.
- Close the pressure relief valve if you opened it.
- Turn off the water on your sink or tub that you turned on at the beginning.
- Turn on the cold water spigot leading to your hot water heater.
- When the tank is full, open the pressure relief valve to let off any excess air.
- Turn on the hot water spigot of a sink or tub to get the air out of the system. Coldwater should be coming out of the faucet at this point. Turn it off.
- If you shut off the gas to your hot water heater, turn it back on.
- If you turned the thermostat off on your hot water heater, re-light the pilot light, and then turn it to on.
- If you have an electric hot water heater, flip the breaker switch on your electrical panel that gives power to your hot water heater.
- Wait about 20 minutes for the water to heat up. Turn on a hot water spigot somewhere in your house to ensure hot water is coming out.
And there you have it. You’ve flushed your hot water heater.
Now we realize that while this isn’t an impossible project to do yourself at home, it does take time and energy. If you are busy and you wish there was someone that could help you with things like this, we are here to help. Our trained HomeSmile’s technicians flush your water heater as part of our home maintenance service. Regular water heater flushing will greatly extend the useful life of your water heater. Regular flushing reduces the amount of sedimentary buildup on the bottom of your tank (or tanks) which interferes with the heating elements of your water heater located at the bottom of the tank. This requires more energy to heat the water through the sedimentary buildup, therefore increasing your energy bill. Appliances that are regularly maintained are more cost-efficient and last longer. The cost to replace a water heater can exceed $2,000-$3,000 dollars, leave your family without hot water, and waste a tremendous amount of your time. Extend the useful life of this appliance with regular flushing maintenance.
To book your HomeSmiles service today, CLICK HERE.
Related Posts
- Siding Washing: The Ultimate Guide to Cleaning and Maintaining Your Home's Exterior
- Why Battery Operated Smoke Detectors and CO Alarms Are Crucial
- Elevate Your Home's Curb Appeal with HomeSmiles
- Best No Streak Window Cleaner: Tips and Techniques for Crystal Clear Windows
- A Complete Guide on How to Remove Stains from Concrete Driveways